
5.3. Drawing Reaction Mechanisms
A common task in organic chemistry is to draw a reaction mechanism for converting a given starting material into a desired product. This helps familiarize students with the different types of chemical reactions and how/where they occur. It is possible to memorize mechanisms for many different reactions. However, it is much more useful to recognize the patterns, rules, and features of reaction mechanisms. When reaction mechanisms are understood most chemical reactions become much easier to interpret. Additionally, predicting products and outcomes, such as which stereoisomer(s) can be formed, becomes significantly simpler.
5.3.1. Identifying Areas of Importance
Reaction mechanisms work by moving electrons around to form or break bonds. When drawing a reaction mechanism it is useful to recognize areas with a high amount of electron density. This electron density may be able to create a new bond.
Heteroatoms typically have lone pairs on them, which may be used to make a new bond (Figure 5.10). Pi (π) bonds are higher in energy than sigma (σ) bonds. As a result, they are easier to break. This means that electrons in π bonds might be available to make a new bond. By definition anions have an excess of electron density, which again may be used to create new bonds.

Figure 5.10 – Highlighted Areas of High Electron Density.
When drawing a reaction mechanism it is useful to recognize areas with a low amount of electron density. These areas may want to gain electron density in the form of a new bond or lone pair.
Electronegative atoms tend to create polar bonds, which creates areas of lower electron density (Figure 5.11). The atoms with less electron density may be areas where new, less polar bonds may be formed. Pi (π) bonds are higher in energy than sigma (σ) bonds. This means that atoms in π bonds may want to make a new σ bond instead, gaining stability (and electron density). By definition cations have a deficiency of electron density, which again may result in a possible target for a new bond if the cation has an incomplete octet.
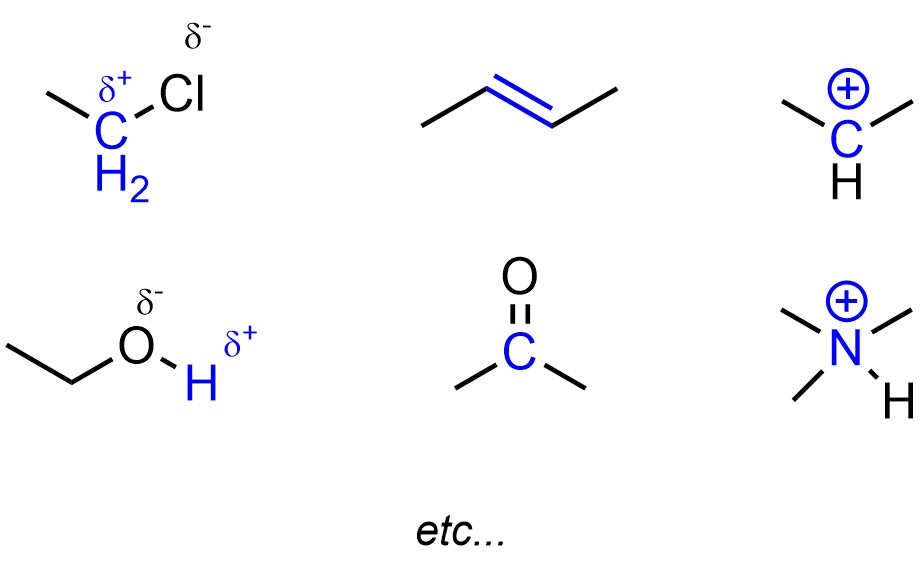
Figure 5.11 – Highlighted Areas of Low Electron Density.
Recall that a functional group is a collection of specific atoms connected in a specific way. Since structure directly dictates reactivity, functional groups behave VERY similarly (often identically) in each molecule they are part of. As a result, when drawing a reaction mechanism it is useful to recognize and/or label functional groups. This leads to pattern recognition. For example, recognizing that a primary alcohol in one molecule undergoes a certain reaction via a certain mechanism means that a different primary alcohol in a different molecule can probably undergo the same type of reaction via the same type of mechanism.
5.3.2. Different Types of Arrows
Arrows are very common in organic chemistry. There are several different types of arrows, with each used to represent a different process or concept (Table 5.1). When drawing reaction mechanisms using the wrong kind of arrow often makes the mechanism wrong.
Table 5.1 – Common Arrows in Organic Chemistry.
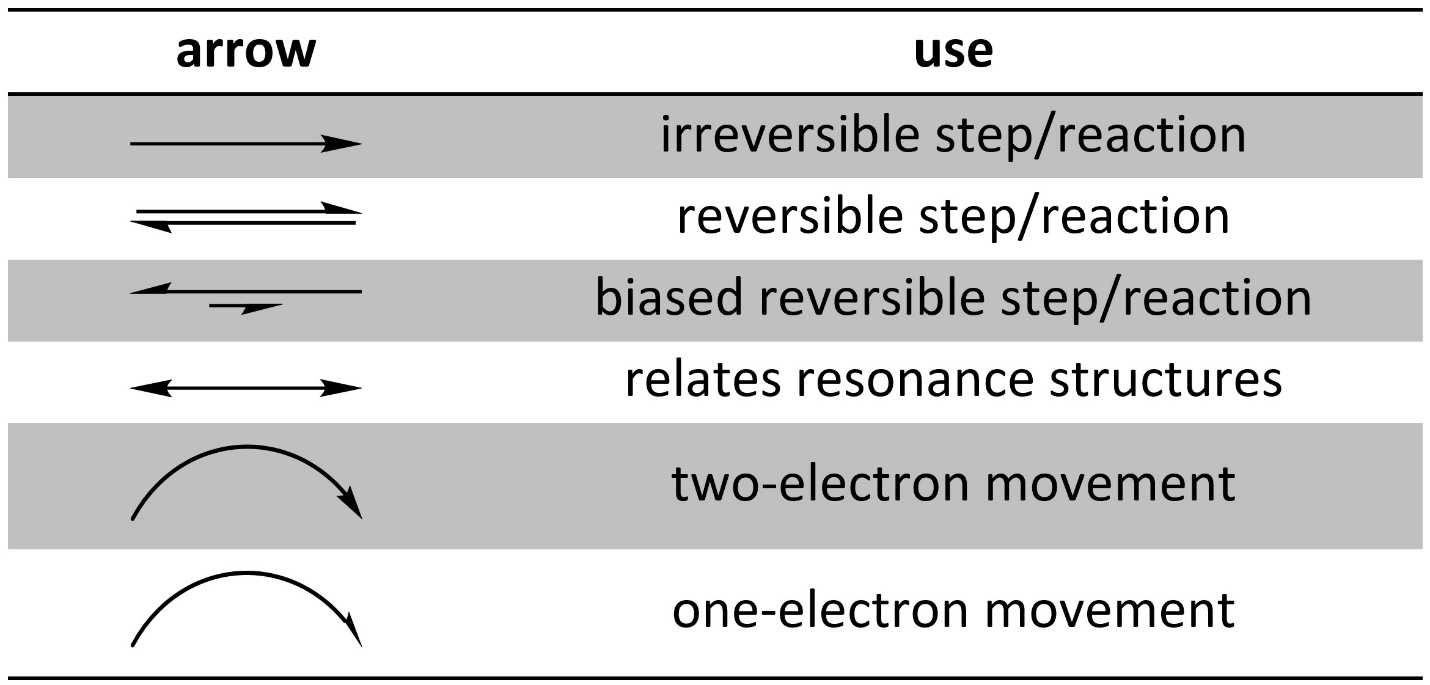
Correct use of arrows is expected at an introductory level. An exception is sometimes made when distinguishing between reversible and irreversible for a step in a reaction mechanism; at an introductory level it may be difficult to determine whether a step is reversible or not. A biased reversible arrow is used when the compounds on the two sides may interconvert, such as in equilibrium, but where one side is favoured over the other (the longer arrow points to that side).
Curved arrows are used to show electron movement. If the end is a full arrowhead, it represents a pair of electrons moving. If the end is a half arrowhead, it represents a single electron moving. When a single electron moves it is called a radical. Radical reactions are somewhat uncommon in nature. They do not follow many of the rules for “normal” chemical reactions. As a result, they are not featured in this text.
5.3.3. General Tips for Curved Arrows
Curved arrows are used to show electron movement. In all cases the arrow starts where the electrons are and ends where the electrons will be. Often this means the arrow starts at an area of high electron density and points to an area of low electron density. If a new bond is forming it will point to the atom it is being formed to (Figure 5.12). If a bond is becoming a lone pair it will point to the atom it will be associated with.

Figure 5.12 – Explanation for Curved Arrow Use.
When drawing arrows that make or break π bonds there are two conventions. Under the old convention, the arrow points to the area where the new bond will be (Figure 5.13). This approach works well for making π bonds but may be confusing for when they are being converted into σ bonds.
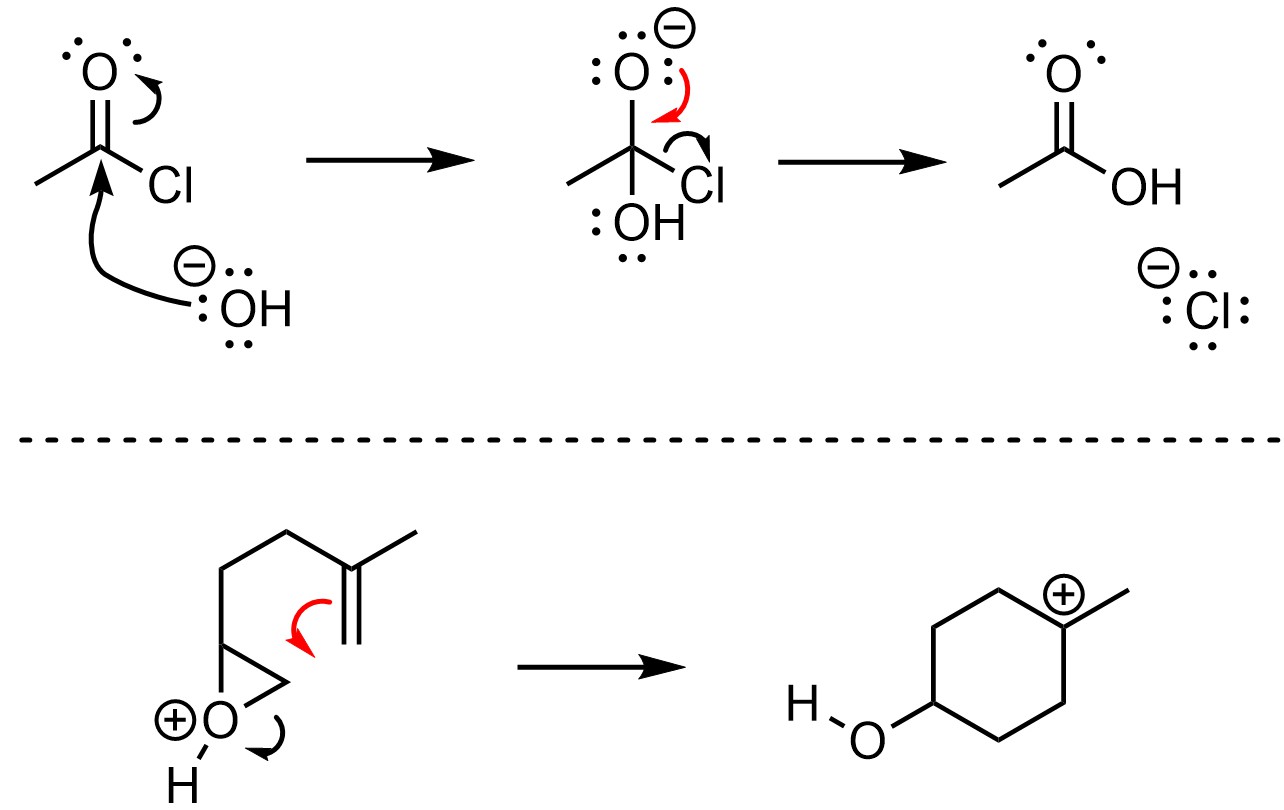
Figure 5.13 – Old Convention for π-Bond Formation or Breakage.
Under the new convention, the arrow points to the atom that the new bond is to (Figure 5.14). This approach is more consistent with the formation and breaking of σ bonds. However, it is less commonly used.
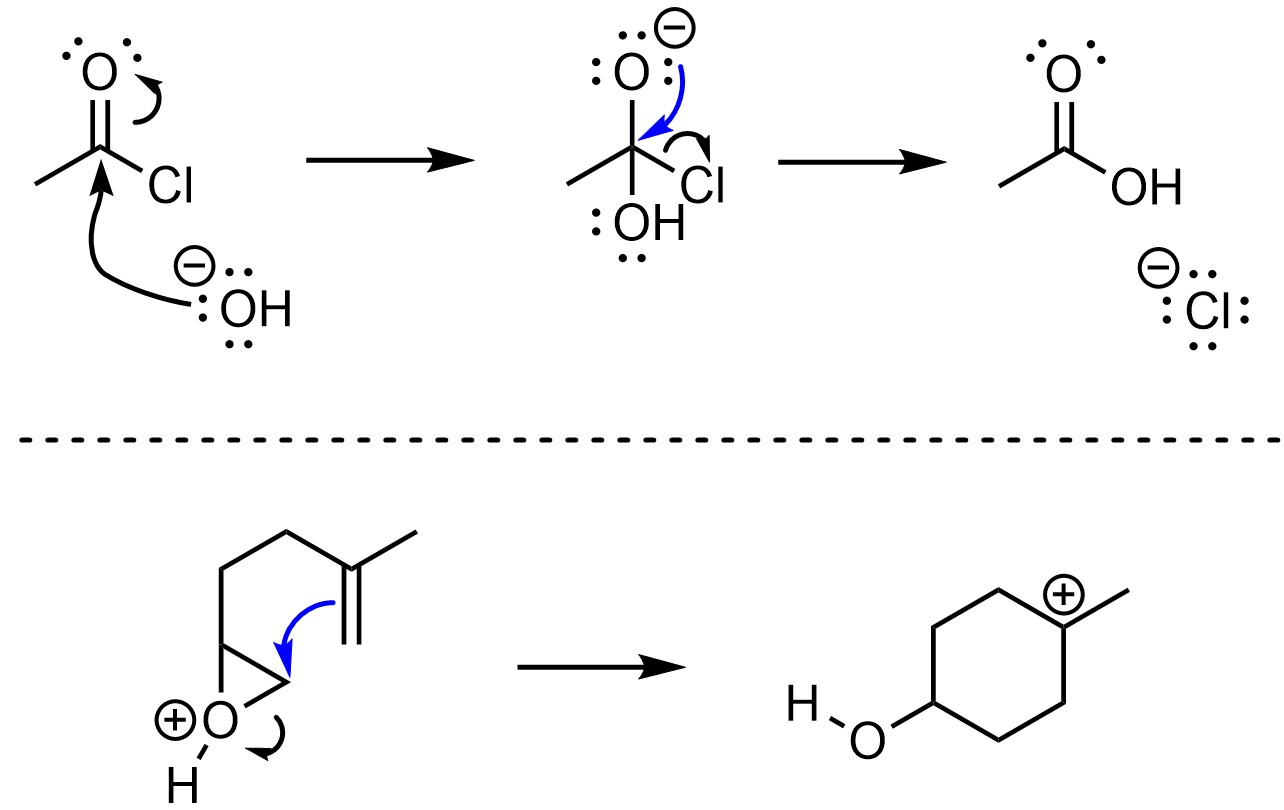
Figure 5.14 – New Convention for π-Bond Formation or Breakage.
When drawing arrows that make or break π bonds using either convention is acceptable.
When an arrow ends at an atom that atom is gaining electron density. As a result, its formal charge may change (decrease; Figure 5.15). When an arrow points away from an atom that atom is losing electron density. As a result, its formal charge may change (increase). If an arrow points to an atom and another arrow points away, usually their effects cancel, and the formal charge will not change. It may be easier to simply draw the resulting product(s) of a series of arrows and then quickly assign formal charges to all atoms, rather than memorize a series of new rules for the process.

Figure 5.15 – Curved Arrows and Formal Charge.
5.3.4. General Tips for Drawing/Determining “Unknown” Reaction Mechanisms
This section may be considered a primer for drawing reaction mechanisms. As such, it is likely useful to periodically revisit and review this section when encountering reaction mechanisms in subsequent chapters.
When drawing reaction mechanisms, it is often helpful to explicitly draw in all lone pairs. This makes it easier to see which atoms may be nucleophilic (see Section 7.2) and helps keep track of formal charges.
When drawing reaction mechanisms, always draw all atoms involved in the mechanism. For example, if a proton (hydrogen) will be moving in a step, draw it in explicitly. If there are side products from a step, draw and keep track of them. This avoids situations where a molecule “disappears” at one step but is needed for a later step. Without having it drawn you may forget it is available.
When drawing reaction mechanisms, it is often helpful to confirm that the actual product is obtained. Particularly with longer reaction mechanisms, it is possible to draw many steps and end one or two steps early, resulting in an incomplete mechanism. It is also possible to accidentally generate a different “product”, where arrows and electrons flowed but “created” a different molecule than intended.
Even chemists with years of experience and practice drawing mechanisms will occasionally get stuck or lost when trying to determine the next step. When drawing reaction mechanisms, it may be helpful to work backwards from the product. If some steps forward from the starting material(s) can be proposed, and some steps backwards from the product(s) can be proposed, it might be easier to see how the two parts of the mechanism are related and fill in the missing steps. Additionally, this may help finds mistakes in your proposed mechanism: you may realize that you made an error in an early step by examining what steps must come after.
The following suggestion will not make sense without the context of later chapters and terminology. Review it after Chapter 7, and periodically as needed.
At an introductory level the overwhelming majority of compounds can be classed as acids, bases, nucleophiles, and/or electrophiles. Many molecules are more than one of these things at the same time. When drawing reaction mechanisms, it is often helpful to class each compound as an acid, base, nucleophile, and/or electrophile. This makes it much easier to predict what steps may be possible. For example, if compound A is an acid and a nucleophile, and Compound B is only an electrophile (and A and B are the only compounds in the reaction), the next step is very likely to be a nucleophilic attack of A onto B. This is especially helpful in situations where you are stuck without any options or ideas for proposing another step.
